 Tlingit Indians of Southeastern Alaska Tlingit Indians of Southeastern Alaska
APPENDIX J
SOME NORTHWEST COAST ART ACTIVITIES
The following activities are contained in this Appendix:
Natural Dyes; Making a Chilkat Style Blanket
Button Blanket
Tlingit Beading
Tlingit Sewing Patterns
Make a Clan House
Make a Wall Panel
Chilkat Blanket Box
Northwest Coastal (Sic) Masks
| Lesson: |
Natural Dyes; Making a Chilkat-style blanket by Roberta Gould |
|
Time:
|
Extend over 3 days |
| Grade Level: |
Intermediate |
| I. |
Materials
glue, needle & thread, mild soap, cloth (cotton), salt, vinegar,
enamel or copper pot, stove or hot plate, dry towels, dye stuff (see text)
|
| II. |
Objectives
A. To introduce students to dyeing.
B. To show students alternate sources for dye.
C. To engage students in actual dyeing activities.
|
| III. |
Personal Backoround
The following activity comes from an Alaska State Museum workshop in
which children dyed and made a Chilkat-style (Tlingit) blanket. You may
want your students to make other items from other cultures. You may also
wish to modify and use only berries (fresh frozen blue or black berries
are best) and white yarn to dye.
If you decide to make a Chilkat-style blanket, first look through art
books containing pictures of Northwest Coast art. Find a number of Chilkat
blankets and study the designs. Then, as a class or in a subcommittee,
draw the life-size design for your blanket before you begin dyeing the
material.
You could divide your blanket-making groups up into boys and girls.
This division reflects the traditional method of producing a Chilkat blanket.
The boys' groups could supervise the drawing of the design and make pattern
boards, and the girls' groups could supervise the sewing itself. You might,
however, allow both sexes to partake in both activities so that all the
students will be involved throughout the entire process.
When the pieces of dyed materials have been dried and ironed, make sure
they are the proper size and shape for the design -- and begin putting
the "blanket" together. The students can either glue the pieces in
place, or, if they are more energetic, sew them in place using black thread
and a simple running or slip sticth. When the blanket is complete, hang
it on the wall or have some students model it. Then invite the
parents to the classroom to see it.
|
| IV. |
Procedures
Before dyeing the cloth, wash it in hot soft water with a mild soap.
Rinse the cotton in hot water and allow it to sit for several hours. Then
rinse it two or three times in cooler water.
There are basically two processes to dyeing: mordanting, or preparing
the cloth so it will pick up and keep the dyes; and dyeing. The Tlingits
and most other Indians used urine as a mordant but this seems impractical
for a children's program.
How to Mordant: To mordant enough cotton to make a Chilkat-style
blanket: add 3 tablespoons salt and 1 cup vinegar to 2 gallons of lukewarm
water in an enamel or copper pot (iron darkens colors and tin makes them
harsh). Then wetted cotton is immersed and the bath is heated to boiling,
then allowed to boil for one hour. The bath is cooled (overnight if possible);
then the cloth is removed, rinsed, and wrapped in a towel ready to be
dyed.
Other mordant chemicals which can be used with cotton are: water glass
(sodium silicate or potassium silicate), tea (tannic acid), washing soda
(sodium carbonate), alum (aluminum potassium sulfate). When using alum,
use 4 oz.- alum, 1 oz. washing soda, and 4 gallons of water to 1 lb. of
cotton. Each mordant will, when combined with a given dyestuff, produce
a unique color.
How to Dye: In dyeing your cloth, the color must first be released
from the dyestuff. This is done through breaking up, squishing, soaking,
and cutting the dye, then boiling it in a couple of gallons of water for
as long as possible. Bark takes the longest boiling to release the color,
and an overnight soaking helps a lot. A blender is a marvelous way to
cut up things finely so they will give the maximum dye.
Add enough cold soft water to the dyebath to reach a sufficient level:
4 gallons of water for each pound of material to be dyed. Strain the bath
and immerse the mordanted cotton in the cool dyebath. It is essential
to totally submerge the cloth and then bring it to a low simmer. If the
dyebath is very hot when you want to put the cloth in, get the cloth slowly
hot by holding it under a running faucet, first cold and then hotter and
hotter water until you can't hold it any longer; then drop it immediately
in the hot dyebath.
Dyeing may take from 10 minutes to an hour of simmering. Usually the
color will get darker the longer you leave the cloth in so it is best
to be patient. When you take the cotton out of the dyebath, rinse it in
hot, then cooler and cooler water until it is cold. Wrap it in a towel
to absorb excess moisture, and then hang it up to dry in the shade.
|
| V. |
Evaluation
During the dyeing section of the Museum workshop, we found that some
children were terribly excited by the whole process, while others found
it too long and got bored. On the days you dye, you might also have one
or two other activities going to keep bored children busy. At the Museum,
regardless of initial reaction, everyone was excited by the results of
the projects.
Plants used in the Museum workshop were:
bark - alder, hemlock, onion skins
berries - blueberries, crowberries, salmonberries flowers
- lupin, fireweed, goldenrod, yarrow
leaves - labrador tea, horsetail rush, bracken (fern), clubmoss
You can look up these plants for dyeing in a plant book to learn what
to look for; try anything that you think looks colorful or read further
in natural dye books.
The Tlingits used hemlock bark for black, copper for blue, and wolf moss
for yellow in dyeing mountain goat wool. They used nettles, blueberries,
and hemlock bark as dye for baskets.
|
| VI. |
Reference Books
Natural Dyes and Home Dyeing, Rita Adrosko (Dover Publications)
Dye Plants and Dyeing, Brooklyn Botanical Garden, Brooklyn, N.Y.
Indian Vegetable Dyes Parts I & II, Denver Art Museum
|
| Lesson: |
Button Blanket by Cindy Folsom and Edna Lamebull |
| Time: |
5-7 class periods |
| Grade Level: |
Intermediate - Junior High School
|
| I. |
Materials
Northwest Coast Indian Art - Holm
Monuments in Cedar
Haidas
other NWC art books
Alaska Magazines/Alaska Journal
VT 14 - Tlingit Dancers
materials needed for button blanket (felt, pearl buttons, needles, thread)
Northwest Coast crest designs (from art books)
|
| II. |
Objectives
- Students will go to the library to do research on button blankets.
They will learn the history and use of the blanket in ceremonies.
- Students will learn 4 main elements of NWC design.
- Students will do reports on various NWC crafts and traditions.
- Students will make maps of NWC tribal variations.
|
| III. |
Procedures
- Go to library to do research on Tlingit/Haida design and button blanket.
- Students will see VT 14 on Tlingit dancers (button blankets are shown
in VT).
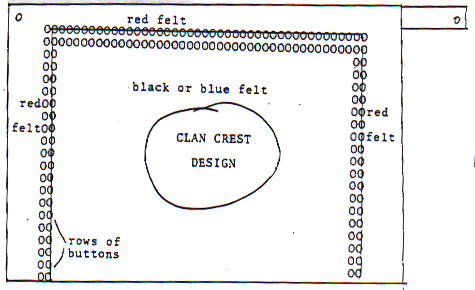
- After doing research on the button blanket, decide the size of the
blanket you wish to make, i.e., adult, child, etc., and select a crest
design to be used on it. Depending on the size of the blanket, make
a pattern of the design, using, if necessary, an opaque projector. The
pattern is used to put the design on the blue part of tne blanket.
While making the blanket, discuss the history and use of button blankets.
Include in the discussion significance of the crest design, who makes
the blanket for whom, bringing out a blanket at a potlatch, etc.
An adult blanket should measure approximately 70" wide by 50" long,
with a 6" red trim around the top and sides. The crest design could
be made of either buttons or felt applique. Two rows of buttons should
be sewn around the top and sides of the blanket, directly adjacent to
the red trim.
|
| Lesson: |
Tlingit Beading |
| Time: |
Frame structured by the teacher |
| Grade Level: |
K - 12 |
| I. |
Materials
Needles - sizes #10, 11
Beads - sizes #10, 12
Thread - size #40
Precut felt patterns of raven and coho salmon (paper patterns follow)
Leather thongs
Stiffener for raven and coho salmon (card stock or shirt cardboard,
for instance.)
Glue
Heavy-duty string
|
| II. |
Objectives
- To introduce students to beadsewing in the Tlingit tradition.
- To engage the student in actual beadwork sewing using raven or coho
salmon patterns.
- To explain the meaning of Tlingit beading designs.
|
| III. |
Procedures
- Give background of beadsewing in the old Tlingit Indian tradition.
- Discuss material used
- Skin - leather
- Bone needles
- Discuss use of traditional designs
- Raven
- Coho salmon
- Others (see designs following)
- What types of items were beaded? Why?
- Instructions given to students must include:
- Explanation of beading project of a raven/coho salmon pendant
- Explanation of materials assembled
- Give each student necessary materials
- Pattern pieces - front and back
- Needle
- Beads
- Leather thong
- Stiffener
- Glue
- Demonstrate with threaded needle:
- How and where to place needle through material
- How to place beads on the needle
- How to secure beads onto material
- Show and explain the uses of the front and back pieces of pattern.
- Beaded design is done on front pattern
- Leather thong is sewn on the back side of pattern
- Have students complete beaded design on front pattern.
- Have students glue stiffener on the back pattern.
- Sew leather thong onto the back pattern.
- Have students sew front and back pieces together.
- Put string through loop of leather and place around neck.
|
| IV. |
Evaluation
A. Were my instructions clearly stated?
B. Did students show enthusiasm and interest in the project?
C. Were the objectives met?
D. How could I have improved the lesson?
|
Adapted by Mary Ann Hanak from:
"Success Activities in Beadsewing"
Indian Studies Program
City and Borough of Juneau School District
Juneau, Alaska
Tlingit Sewing Patterns (in pdf)
| Lesson: |
Make a Clan House by Patricia H. Partnow |
| Time: |
on-going if resources are used
|
| Grade Level: |
Intermediate, however, primary can create a room-size clan
house. |
|
I.
|
Materials
Masking tape, blankets, art supplies, one or more copies of In a
Tlingit Winter House (available from the lEA office), Tlingit story
books (see bibliography)
|
| II. |
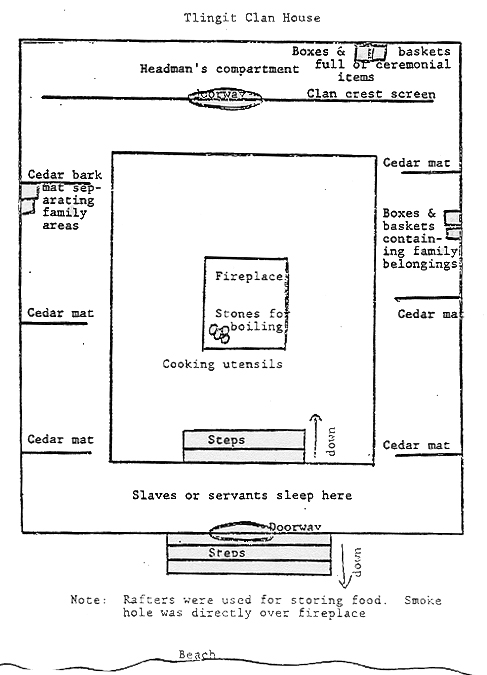
Background
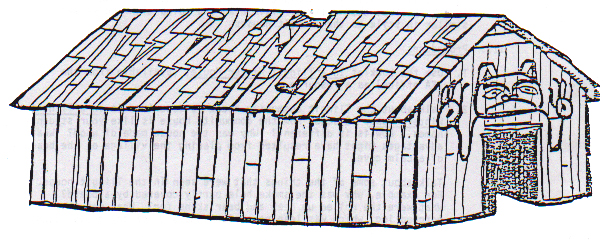
The Tlingit clan house was the basis of Tlingit social organization up
to the turn of the century. The house was owned by the clan as a whole,
though the headman, or chief of the clan, had proprietorship and responsibility
over it. An entire clan or segment of a clan lived in a house, and identified
with it; there were thus sometimes as many as 40 or 50 people living in
a large clan house.
Clan membership was determined through the mother's line. Thus all children
of a marriage belonged to the mother's, not the father's clan. Although
a couple usually lived with the husband's clan after marriage, their children
(especially the sons) went to live in the mother's clan house when they
reached an age of learning (i.e., when it was time to learn to be a hunter
and clan member). Clan houses were named, and people identified with that
name. For instance, a certain house might be called the Snail House, and
had a crest design of the snail which showed this relationship.
Since the clan house was so important in the social structure of Tlingit
life, it is a good place to begin teaching your students something about
that culture. Tsimshian and Haida clan houses were similar in style to
the Tlingit houses.
|
| III. |
Procedures
| 1. |
Use the booklet In aTlingit Winter House, (available from
the IEA office) as a resource. |
| 2. |
Talk about the Tlingit community house as described in In a
Tlingit Winter House. Discuss how the community house is like
your students' homes. How is it different? Why was the house made
of wood? What advantages might have resulted from placing the village
on the beach of a calm cove?
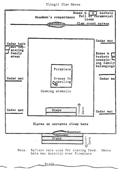
Talk about some of the things that were seen in the Tlingit house.
For example, why was the smoke hole partly covered by a board? What
were the rolled up deer and bear skins for? What was the notched
log, which was leaning against one side of the house, used for?
What does the suit of armor in one, of the wooden boxes tell you
about the inhabitants of the.village? Who probably lives in the
separate room at the back of the house?
|
| 3. |
Build a model house in your classroom out of wood, cardboard, whatever
is available. If you visit the museum, look closely at some of the
objects which might be included as part of the house (for instance,
the bentwood boxes and spruce root baskets, Chilkat blankets, carvings,
totem poles). Then make miniatures of these objects to be placed in
your model community house. |
| 4. |
To give an idea of the living space which pre-contact Tlingits
were accustomed to, go outside and measure off a rectangle about
40' by 50'. This is the approximate size of a pre-contact Tlingit
winter house for about 30 people. Measure off and mark an area for
the platform, for the fire pit, for the screen at the back of the
house, etc. Mark off living areas for separate families.
Turn your classroom into a community house, using masking tape,
rope, blankets, stones, whatever you like to simulate the house.
Mark off the different areas of the house and have students pantomime
some of the activities that would have taken place in them.
|
|
| IV. |
Extension
Look into other types of housing for other lessons.
|
Click on image for a bigger view
| Lesson: |
Make a Wall Panel by Patricia H. Partnow |
| Time: |
2-3 class sessions |
| Grade Level: |
3-6 grade |
| I. |
Materials
Books on Northwest Coast art (see appendix C,
Art Bibliography)
Books containing clan crest stories:
Kiksadi Dog Salmon Legend by A. P. Johnson
K'eet - Kake Version by Henry Davis
"The Girl and the Woodworm" (from Tlingit Stories by Maria
Ackerman)
Many of the stories associated with totem poles in The Wolf and
the Raven by Garfield and Forrest
Chapter I, "The One Horned Mountain Goat" in Once Upon a Totem
by Christie Harris
You might also check out UN 516 (Tlingit Stories Kit) from the AVS
Center
projector
poster paints
butcher paper
|
| II. |
Objectives
- Students know the relationship between at least one crest design and
the story behind it.
- Students recognize wall panels as a Northwest Coast art form.
- Students participate in choosing a crest design.
- Students participate in designing and painting their design.
|
| III. |
Procedures
This activity, can be done in conjunction with the preceding lesson (Make
a Clan House) or on its own.
Using books or visuals on Northwest Coast Art, have students choose a
fairly simplified crest design. They should research the design to learn
what animal it shows, and what clan it belongs to, if. possible. Then,
using an overhead or opaque projector, project the design on white or
brown buther paper. The projection should be large enough to fill at least
a 5' x 7' section of paper. Students can then trace the design, then paint
in the proper colors (black for primary outlines, red for secondary outlines
and points of emphasis, and blue-green for tertiary areas). Hang the design
on a wall of your classroom as a backdrop for other activities centering
around Native Emphasis Week.
A proper Northwest wall panel should, of course, show a design which
belongs to the clan that owns the house and which tells something of the
clan's history. If you have no Tlingit, Tsimshian, or Haida students in
your class, it would be appropriate for the class to decide on a clan
designation and write a story explaining how they came to earn that designation.
As a model for clan stories, you might turn to one of the books listed
in this lesson under "materials."
|
| IV. |
Evaluation
A. Note student attainment of objectives A through D above.
B. Did students enjoy the activity?
|
The following two art activities were excerpted from Tacoma Public Schools
Indian Education Program Materials, Developed by April 25-29, 1977.
Chilkat Blanket Box (in pdf)
Northwest Coastal Masks (in pdf)
TABLE OF CONTENTS
MATERIALS LIST & GOALS
SECTION 1: Tlingit
Country
SECTION 2:
Clans
SECTION 3: Summer
Camp
SECTION 4: Tlingit
Economy: Surplus
SECTION 5: Wrap
Up
APPENDIX A: Brief
Description of Tlingit Culture
APPENDIX B: A Sample
Winter Clan House
APPENDIX C: Northwest
Coast Materials in ASD AVS Center
APPENDIX D: Juvenile
Literature on Northwest Coast Cultures
APPENDIX E: Art
Bibliography
APPENDIX F: Northwest
Coast Cultures Bibliography
APPENDIX G: Schools
Which Own Northwest Coast Study Prints
APPENDIX H: Raven
Stories (reprints)
APPENDIX I: Recorded
Versions of Clan Crest Stories
APPENDIX J: Some
Northwest Coast Art Activities
|