
Outboard Motor Lower Unit
|
Those of us who have piloted Alaska’s waters with an outboard have learned the importance of having a good lower unit. All the power of the motor is sent to the lower unit. Great forces work through the lower unit. When it works well, all goes well. When it is damaged, everything comes to a halt. Some people have jet units to drive their boats, but they have cost, weight and maintenance problems that keep them out of the reach of most village people. The simple outboard with a lower unit will be around for many years to come.
Lower units are expensive to repair or replace. For those reasons alone, it is important to understand them. |
||
|
|||
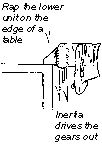 |
DisassemblyTaking a lower unit apart isn’t hard. Describing the process is hard. With the prop off, look around the prop shaft and find a ring that is screwed into the housing. Often there is a locktab to keep it from unscrewing by itself. With the locktab removed, the ring can be unscrewed. See a local expert if you need help in this. With the ring removed, turn the lower unit with the prop shaft down. Holding a hand over the prop shaft so parts don’t fall on the floor, rap the whole lower unit on a bench or block of wood, hitting on the skeg. Inertia quickly drives the gears, seals, and other parts into the waiting hand. Science in action! |
||
GreaseWithout lower unit grease, friction would destroy the gears and bearings in the lower unit within minutes. If the grease is too thick, it can’t get into the small places and prevent the metal from wearing. If the grease is too thin, it doesn’t protect the metal parts from grinding each other. Lower unit grease is specifically designed to work well even if there is a little water in the lower unit. An oldtimer had no lower unit grease, so he put wheel bearing grease in his lower unit. All the gears and bearings spoiled within two hours. It is good to change lower unit grease often, as the little metal chips that break off continue to cause great damage. Fresh grease prevents unnecessary wear. The transmission in a helicopter has a magnet to pick up small pieces of metal that float about before they damage the unit. Newer outboards have a similar magnet on the drain plug to pick up chips and filings. Many snowmachine chain cases have a magnet on the end of the dipstick to pick up loose particles that would cause excessive wear. Changing Grease There are two holes through which the grease is injected into the lower unit. Drain the old grease out of the bottom hole. Fill the lower unit from the bottom until the grease comes out the top hole. If it is filled from the top after inserting the bottom screw, there are many air bubbles. It never would fill completely. |
|||
 |
SealsThe prop shaft and drive shaft are in constant motion. Seals keep the water out and the grease in. The seals must be snug against the moving shafts. Good, healthy, soft seals help to keep the grease in and water out. Since water is not a lubricant, friction in a greaseless environment will destroy the lower unit in minutes. |
||
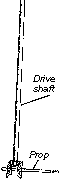
ShaftsThere are two shafts in a lower unit.
The drive shaft runs from the bottom of the crankshaft to the lower unit. The prop shafts bend when impacted with the bottom is great enough. Once the shaft is bent, the shaft and prop vibrate because the prop is not turning in a perfect circle. If this continues, seals wear out from the vibration and water enters the lower unit. The bearings wear excessively from vibration. Roll the prop shaft shaft and if it wobbles, it is bent. If vibration is allowed to continue, replacing the bent shaft will still allow some vibration because the bearings will be worn. |
|||
|
|||
 |
Housing ShapeThe lower unit has to be big enough to hold the gears, and small enough to present the least resistance possible. If the gears are too small, they break easily. If they are too big, pushing the oversized lower unit through the water takes energy away from the forward motion of the boat. The skeg on an outboard protects the prop from impact. If it were shorter, it would expose the prop to obstacles in the water. If it were longer, it would hit the bottom. If it were thinner, it would easily break off. If it were thicker, it would cause too much drag. The angle of the skeg deflects the lower unit from rocks and logs. |
||
Trim TabThe prop spins in one direction causing the motor pull to one side, making steering tiring. On most motors, particularly the big ones, there is a little fin that hangs down behind the prop to counteract that pulling while the boat is in motion. By turning the fin to one side or the other, the twisting of the motor is offset. |
|||
|
This prop
is too damaged.
|
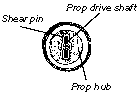
Props On each prop there are two numbers. For example: 10 x 10 or 10 x 13. The first number is the diameter of the prop. A smaller motor will usually have a smaller diameter prop. The second number tells how far the prop would move forward in one revolution if there were no slippage in the water. This is the pitch. A 10 x 10 prop is a work prop. It will go forward ten inches in one revolution. It will push a heavy load. However, the engine turns too fast if there is no load in the boat. Most pilots have extra props to account for the different load conditions under which the boat might operate. Balancing the Load and Prop The load determines the engine’s speed. If the load is too large, the rpm is too low and there is great stress on the motor. If the load is too light, the rpm is too high, and the motor will self-destruct from the inertia of the piston as it goes up and down. Long ago, pistons were made of steel, but their great mass kept engine rpm under 2,000. Pistons are now made from aluminum because aluminum is light. Modern engines turn 5,000 to 12,000 rpm. If the prop doesn’t have enough pitch, the engine will turn too fast. If the prop is has too much pitch, the engine will turn too slow. Balancing the prop to the load and controlling the engine’s speed is critical for the life of the engine. Older motors had shear pins. When a prop hits bottom or an obstacle, the force of impact is great. Action equals reaction. There is a great action driven by the engine, and a great reaction when the prop hits bottom. If there were no shear pin, the prop would be damaged and the pinion gear might break on impact. Designers put a metal pin through the prop shaft that was weaker than the gears. This pin was the only connection between the prop and the shaft. On impact, the shear pin broke and was inexpensive to change. However, when it broke in rough or dangerous water, which it often did, there was furious paddling to safety. Manufacturers tried different innovations and came up with the slip prop. A look at the end view of a prop shows the blades, the hub, an artificial rubber ring, and the inside bushing that has splines and slips over the prop shaft. When the prop hits the bottom, the prop shaft can still spin in the middle while the blades slip on the artificial rubber ring. Problem The slip prop supposedly saves the gears from breaking and the prop from being severely damaged. However, when the prop is new, the ring is stiff, and too much stress is communicated to the gears. When the prop is old, the rubber slips too easily, even when the motor is accelerating. It would be nice to have a way to adjust the tension on the rubber ring to fit the boating conditions, but manufacturers haven’t gotten that far yet. Once the prop has hit bottom several times, it bends and chips. If the prop is out of balance, it will vibrate, damaging the bearings and seals. It is possible to shape the prop again by tapping it with a hammer on a solid surface. It can also be filed, however, it is important to file the front of the prop, giving a flat surface in the back to push against the water. Materials One time I bought a brass prop. I thought it might be better. Wrong! Brass props are okay in salt water, but their mass is so great small chips result in severe vibration. The inertia of a heavy brass prop is much greater than a light aluminum one. The vibration was so great from the brass prop, it snapped my prop shaft in a very short time. Many people are using stainless steel props, as they are tougher, and last longer. However, the owner of a prop shop recently told me that aluminum props are cheaper in the long run. Aluminum easily deforms. Stainless steel is much tougher, but the damage is transmitted to the gears, which are far more expensive and difficult to change. It is better to change aluminum props than lower unit gears. |
||
ConclusionMost outboard motor problems that we have faced in our part of Alaska are lower unit problems. We travel shallow rocky rivers and lower units give out long before the upper units wear. Understanding them and treating them carefully helps lengthen their life, saving money and long trips poling, paddling, or drifting home. |
|||
 |
Activities
|
||
 |
Student Response
|
||
 |
Math
|
 Gears
Gears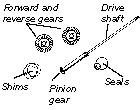 Pinion
Gears
Pinion
Gears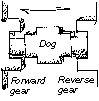 How
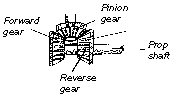
can the forward and reverse gears turn at the same time? Inside
the forward and reverse gears is the prop shaft which has four large
“dogs”. When the shift lever is moved, the dogs connect
with either the forward or reverse gears. Only one of them can engage
the drive shaft at a time. The dogs are strong. If the forward and
reverse gears were always engaging and disengaging with the pinion
gear, they would break off in a moment.
How
can the forward and reverse gears turn at the same time? Inside
the forward and reverse gears is the prop shaft which has four large
“dogs”. When the shift lever is moved, the dogs connect
with either the forward or reverse gears. Only one of them can engage
the drive shaft at a time. The dogs are strong. If the forward and
reverse gears were always engaging and disengaging with the pinion
gear, they would break off in a moment.
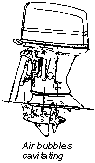 Cavitation
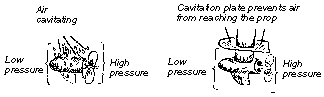
 Interestingly
enough, this fin is made of zinc. When outboards are in salt water,
there is a great chance of a chemical reaction, like a battery,
“eating” one metal on the motor. The fin is made of a
zinc that sacrifices itself. It is “eaten” before the
other more valuable motor parts. It might need to be replaced at
some time if the motor is in salt water, but it is cheap and easy
to replace.
Interestingly
enough, this fin is made of zinc. When outboards are in salt water,
there is a great chance of a chemical reaction, like a battery,
“eating” one metal on the motor. The fin is made of a
zinc that sacrifices itself. It is “eaten” before the
other more valuable motor parts. It might need to be replaced at
some time if the motor is in salt water, but it is cheap and easy
to replace.


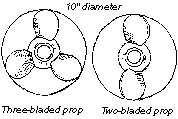 Props
come in different sizes and pitches. The size of the motor determines
the diameter of the prop. The size and load on the boat determine
the pitch.
Props
come in different sizes and pitches. The size of the motor determines
the diameter of the prop. The size and load on the boat determine
the pitch.
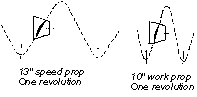 A
10 x 13 prop is a speed prop. It will go forward thirteen inches
in one revolution. It will cause a light boat to go fast, but it
will work the engine too hard if there is a big load.
A
10 x 13 prop is a speed prop. It will go forward thirteen inches
in one revolution. It will cause a light boat to go fast, but it
will work the engine too hard if there is a big load.
 A
Problem Overcome
A
Problem Overcome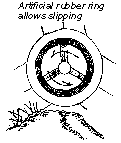 New
Solution
New
Solution