|
|
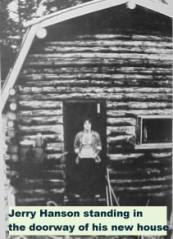
My First Log Cabin As told by Jerry Hanson to Ephim Anahonak Jr |
|||||||||
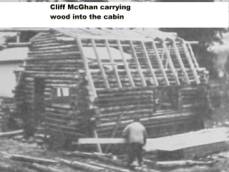
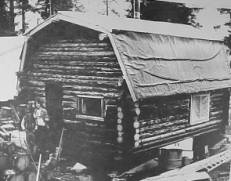
So then you put up your platform on your posts. Then you get your platform squared off with your 2 by 6’s then you nail your plywood on there. For a log cabin you put your first course of logs lengthwise and spike them down onto your platform. On a log cabin you have a log underneath that goes across, that is level. From there you put on your first course and you spike them down. You would need more that 12 inch spikes. So you would go down and get rebar and cut those up and nail those down. So that way your first course of logs are nailed into your platform. Your platform is nailed into your post. When you go up, you have more strength on the house. It’s stable, steady and it won’t move. That’s the process of building the foundation. Next you get your logs. It depends on what kind of logs you want. You can order them from Homer, they are called prefab logs. They’re already cut. Depends on what size you want. There’s 2 sided, 3 sided and 4 sided. I get my logs from around here, from my place, wherever nobody’s lot is. I usually stay on the old English Bay trail. To get the right sized logs, you have to study each tree. Make sure it’s the right size. I cut them down, tow them over by truck to my lot and peel them there. I prepare logs when I get them by the house. To prepare logs, I cut all the knots real close. So that when I’m peeling them, I go right over the knots, also peeling the bark off so they are shaved pretty close. After they are peeled, I hoist the log up on the platform. At the first when I started, I would move the logs by myself. It was low enough then to put the logs up by myself. I cut the log a certain way when I got them up on the platform. I mark it off on each end. I mark where I’m going to put a notch. I put a notch underneath it. Then I turn it around, block it up, so it doesn’t move when I’m using the chain saw. I use a chain saw to cut the depth of my log. I roll it back over to check and see if I’m close enough. If I’m not close and I’ve got some gaps here and there, then I mark it and roll it back over. Where I marked, I go back and use the chainsaw to cut it down level or to what I think is level. If it is not level, I redo the process again. There are several different ways to level your logs. One is called the dog, in some of the books I have. The dog is like a big staple. From the bottom log to your main log, the one your going to put on, you hammer it in. You run your chainsaw through the whole length of the log. You take the dog out and you set it down. When you set that down you’ve cut all your areas, you’re high and it brings you closer to level, to where there are no cracks. You can also cut through your high areas and take that wedge out, that way it will bring you closer. It brings you down. If you still have a high area, you put that wedge in just enough to where you take out a low area. You take the wedge out and it drops down a little closer. After that you should have a perfect straight log with out cracks. Then you roll the log over and put insulation in between the logs. You staple the insulation in so the wind doesn’t blow it out. You mark where each of your last spikes were put in the log. You mark below it. Mark each spike so when you are going to spike your next log in you don’t drive another spike on top of the other. This occurs off and on if you don’t mark them, or when using the drill when you drill your hole to put the spike in. So that would be the process and preparing your logs in order to get a more sturdy and more stable house. What I use to attach the logs for each course, if the log is thick, say a diameter is 8 to 10 inches or a little bigger, I would use 12 inch spikes, with the heads of the spikes cut off. Within 6 to 18 months your house settles and your logs shrink and when they shrink your head nails tend to stay in one place or they move up which leaves a gap. Now if you look closely on some of the other log cabins, if you take a good look around a course of logs you’ll see where some of the gaps are. Either that or there has been a twisted log, it shrunk different. It depends on how you prepare your log house. Also depends on how you attach your log and how level you get it. So my attaching the logs to each other are sometimes with an 8 inch spike. I just drive an 8 inch spike at the small end of the log. I go down 4 or 5 feet from the end where I attached the corner. I go down and drill a hole there and if it’s too big for an 8 inch spike, I put in a 12 inch spike instead. (I think you can get a 10 inch spike but I’m not sure.) The heads of the spikes are also cut off. You drive those in, counter sink them with some other rebar or something like that. You counter sink them to 1 – 2 inches, that’s for shrinkage of your whole log, so it doesn’t interfere with the log up above it. That’s how I attach them. That’s how the books say to attach them too. I’ve done a lot of reading on this since my freshman or sophomore year in high school. There’s different ways of attaching the doors and windows. I did it a lot easier because I’m working by myself a lot of the time. I put my frames in first, at whatever level or course of logs I decided on. I chiseled down 4 or 4 inches into the log I’m using. Then I put the frame in, making sure it is level. I’ve made my own frames to fit precisely for my windows so the windows can slide in. I might use screws to tack the windows in and put insulation around them. This way, as I’m going up I’m not using full course logs all around. Some of them are 11 feet to 6feet on the end and 4 feet to 25 inches on the other end. So it’s going up fast, but not as much log or as much work. It’s a little easier. As I’m progressing up the wall, I’m going into more full course logs as I go above my window and door frames. It’s getting a little rougher to handle full-course logs, but it’s more worthwhile. Another way would be to use full-course logs all the way up the whole wall. Then you would use the chainsaw later to cut out the door and window openings. When you go to cut the openings, you must remember where your spikes are so you don’t hit them with the chainsaw. So in that way you should mark or measure where your spikes are so you won’t be cutting into them with your chainsaw. I use the method that was easiest for me. If I had two or three more guys helping me, I would have gone full course logs all the way up. But full course logs are heavier and I’m working alone. I’m going to put a loft in the cabin. The height of my loft up to the top of my roof has to be enough to walk around in. I plan to have a bed up there, a chest of drawers and maybe a closet, and still have enough room to walk around in. So that will give me a kitchen and living room downstairs. Maybe I’ll have to add on a 10’ X 12’ addition later on to put things in; washer, dryer, freezer and other things. I’ve got plans for my roof to fit my needs for upstairs. Instead of a normal pitch roof, I’m going to put up a gambrel roof. There are some different specifications to make it, compared to the regular framework of a normal pitch roof. For my center beam, I’ll use a ridge log or ridge pole. Then on the sides of the ridge, I’ll need two other logs. From there I’ll have logs going parallel to that. I’ll need a full course of logs all the way around right below the roof. I’ll put my windows below the full course to keep the walls from moving out. My roof will anchor the top full course of logs. The cost depends on what materials you want for your roofing or what materials you’ll need for your house. It varies according to what spikes you use, gas for a generator for electricity, and others. I’ve used 15 gallons of gas just on the chainsaw. Then there’s oil, too. I’ve used about 3 rolls if insulation up to now. For my roofing the cost is pretty high. I’m going to put aluminum roofing on the house with Styrofoam insulation. For underneath the house, I’ll use fiberglass insulation, which would bring me up to about 9 or 10 rolls. There are quite a few materials to use on the roof. They are rafters, plywood that is nailed on the rafters, and then Styrofoam insulation on top of the plywood. Then I will put sheet metal, (Aluminum), on top of the insulation, to keep the snow off during the winter time. Then I won’t have to worry about shoveling the snow off the roof. I got most of my information from books. I’ve read six or seven different books on log cabins. I’ve also talked it over with my brother-in-law Jerry, and he’s been my teacher as I’ve been going along. From books I’ve stored up knowledge and picked out ideas I could use; the easiest, yet sturdiest way of going about it. From there I would discuss it with Jerry and did the best I could to build it. I feel like it has turned out pretty good.
|
||||||||||
|
|
Copyright
1981, Kenai Peninsula Borough School
District. All rights reserved Volume 2 |
|
||||||||